
Deploying a web hosting infrastructure in AWS
How to deploy a web hosting infrastructure in AWS
Project Scenario
Company x is planning on launching a wordpress application on AWS. The company requires a well-structured network within AWS to support its application. The project is divided into two parts, part 1: requires setting up a VPC and part 2: requires setting up an EC2 instance inside the created VPC and deploying the application inside the EC2 instance. The application should be hosted in a way that if one AZ goes down the application should run from the second AZ.
Project Breakdown
- 2 AZ will be used for high availability and reliability
- There will be 4 servers deployed (2 ECs for application and 2 for database)
- One AZ will host 1 EC2 instance and 1 database while the other will host the other
- 2 subnets will be created in each AZ, one private to host the database and 1 public to host the EC2 instances, this will be used to host the wordpress application.
Services used
- AWS VPC
- AWS Security groups
- AWS Internet gateway
- AWS Nat gateway
- AWS MySQL
- AWS EC2
- AWS Route53
Part 1: VPC creation
Step 1: VPC planning and design
region used:
- Africa(Cape Town)
Subnet design
Subnets block used:192.168.1.0/24
| Category | Network | Hosts | Reserved by AWS | Broadcast |
|---|---|---|---|---|
| Private(AZ1) | 192.168.1.0/26 | 192.168.1.4 to 192.168.1.62 | 192.168.1.1 to 192.168.1.3 | 192.168.1.63 |
| Public(AZ1) | 192.168.1.64/26 | 192.168.1.68 to 192.168.1.126 | 192.168.1.65 to 192.168.1.67 | 192.168.1.127 |
| Private(AZ2) | 192.168.1.128/26 | 192.168.1.132 to 192.168.1.190 | 192.168.1.129 to 192.168.1.131 | 192.168.1.191 |
| Public(AZ2) | 192.168.1.192/26 | 192.168.1.196 to 192.168.1.254 | 192.168.1.193 to 192.168.1.195 | 192.168.1.255 |
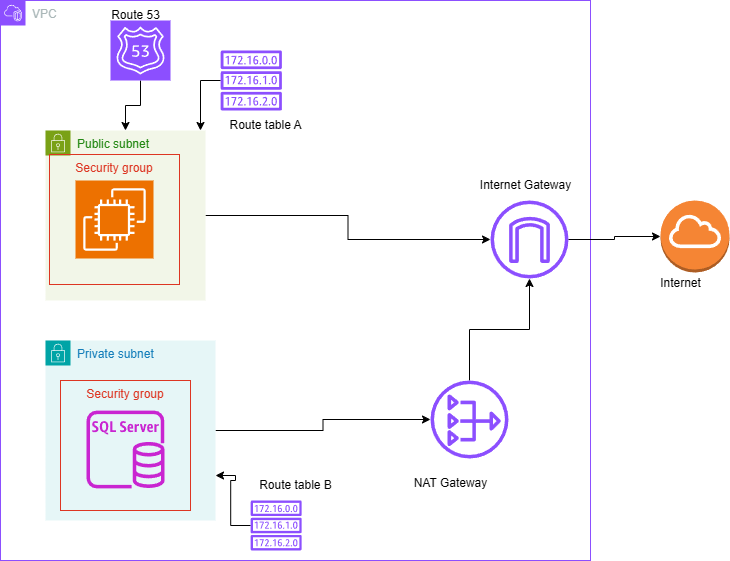
Internet connectivity
Internet gateway will be used to connect private subnets to the internet and NAT gateway will be used to establish a connection from the private subnets to another external VPC if necessary route table will be used to ensure only a specific subnet can get access to this private subnet.
Security
- Security groups will be used to control source ports & protocols for inbound and outbound rules
- Use custom NACL to allow specific traffic to have access to private or public subnets if necessary.
Step 2: creating the VPC network
- Open the Amazon VPC console.
- From the navigation bar, choose the Regions selector and then choose the Region in which you are going to create a VPC (af-africa).
- On the VPC dashboard, choose Create VPC and select VPC only
- Name tag – put VPC name (my-vpc)
- Select IPv4 CIDR manual input
- Put your network IP 192.168.1.0/24 in IPv4 CIDR as planned in the table above
- Click on “Create VPC”
Step 3: set up subnets
- In AWS console, click on “Subnets” which is in left side.
- Click on “Create subnets” and select your VPC in which you want to create subnets. In our scenario it is “my-vpc”:
- Put Subnet name “prvt-sub1” in Subnet settings
- Select “Availability zones” on which AZ you want to create subnet
- Select “IPv4 VPC CIDR block” (select your VPC CIDR - 192.168.1.0/26)
- Click on “Add New Subnet” to create more subnets and their ip
step 4: configure internet access and Nat gateway
Internet Gateway
- In AWS console, select internet gateway
- click on create internet gateway and give it a name(my-IGW)
- click on actions and select attach VPC
- from the VPC dropdown menu attach the internet gateway created
- click attach internet gateway after selecting your VPC
NAT Gateway
- click on the NAT gateway on the AWS console
- click create NAT gateway and specify name
- Select subnet in which to create the NAT gateway
- for connectivity, leave the public selection to create a public NAT gateway
step 5: Implement network security
Network ACL
- Choose network ACLs and create network ACL
- Name your network ACL and select the ID of your VPC from the VPC list
adding rules
- In the details pane of the network ACL, choose either outbound or inbound rules tab and select edit
- Under rule, add rule number(AWS recommend to use an increment of 100). Rule number must not be already in use.
- Select a rule from the type list. the list include different protocols to choose from e.g Http,TCP etc.
- For a protocol thats not available, choose custom protocol
- In the source or destination field enter the CIDR range that the rules applied to.
- From the allow/deny list, select ALLOW to allow the specified traffic or DENY to deny specified traffic
- To add another rule, choose "Add another rule" and repeat the steps above
- When you are done, choose Save
step 6:Create Route table
- Choose route table and click on create route table
- Name the route table(public-rt and private-rt) and select your VPC from the dropdown menu. Click create route table when done
- associate route table to public subnet
- Go on subnet associations and click subnet associations
- Select public subnets(select subnets created) and click save associations
- To associate private route table to private subnet click on the checkbox for private-rt
- Go on subnet associations and select edit associations
- Select private subnets(subnets created) and click save associations